
Learn the best techniques for applying highlighter to achieve a radiant, natural-looking glow effortlessly.
Highlighter is a fantastic tool to enhance your natural beauty by illuminating the face and adding a healthy, vibrant glow. When applied correctly, it can make you look more awake and refreshed.
However, achieving a natural glow with highlighter can be tricky, especially if you’re not sure where or how to apply it.
This article will guide you through the steps to apply highlighter for a subtle, natural-looking effect.
1. Choose the Right Highlighter
The first step to a natural glow is choosing the right type of highlighter for your skin tone and type. If you have dry skin, a liquid or cream highlighter can add moisture and radiance. For oily skin, a powder highlighter may be best as it helps control shine.
For the color, pale pink and pearl shades generally look great on light skin tones, golden tones suit olive skin, and rose gold or bronze shades complement darker skin tones.
2. Prepare Your Skin
Before applying highlighter, make sure your skin is properly prepped.
Cleanse, moisturize, and apply foundation if desired. A smooth, hydrated base will allow the highlighter to blend effortlessly and create a more natural finish.
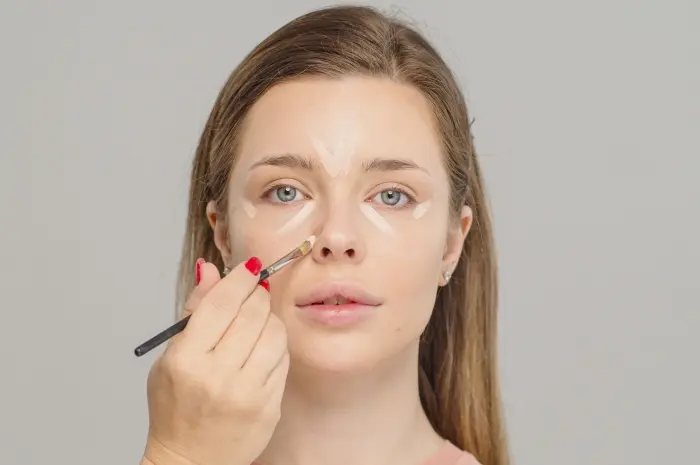
3. Apply to High Points of the Face
Apply highlighter to the areas of your face where light naturally hits, such as:
- Cheekbones: Start from the hairline above the apples of your cheeks and follow the line of your cheekbone up towards your temple.
- Brow bone: Lightly apply beneath your eyebrow to define and lift the brows.
- Bridge of the nose: A small amount down the center of the nose can create the illusion of a straighter nose. Be cautious with this step if you have a very oily T-zone.
- Cupid’s bow: A dab above your upper lip can make your lips look fuller.
- Chin: A touch on the center of the chin can help enhance your face’s natural contours.
4. Use the Right Tools
The tool you use to apply highlighter depends on the formula:
- Fingers: Ideal for applying liquid or cream highlighters, as the warmth from your fingers helps the product blend seamlessly into the skin for a smooth finish.
- Fan brush: This is ideal for a soft, subtle application of powder highlighter. It helps distribute a light dusting of product.
- Sponge: Use a damp makeup sponge to blend cream or liquid highlighters by tapping the product into your skin.
5. Blend, Blend, Blend
Blending is key to achieving a natural glow. Whether you’re using a brush, sponge, or fingers, make sure to blend the edges of the highlighter thoroughly into your foundation or bare skin.
This prevents any harsh lines and helps the highlighter mimic a natural sheen.
6. Set Your Highlighter
If you’re using a cream or liquid highlighter, you might want to lightly dust a translucent powder over it to set it in place, especially if you have oily skin.
However, be careful not to overdo it as too much powder can dull the shine.
7. Use a Light Hand
The most common mistake with highlighter is using too much product. Start with a small amount; you can always build up if needed. It’s easier to add more than to take away excess.
Conclusion
Applying highlighter for a natural-looking glow is all about subtlety and placement.
By highlighting specific areas and blending thoroughly, you can enhance your features in a soft and flattering way.
Remember, the goal is to look like you are naturally radiant, not like you are wearing a highlighter.
With practice and the right techniques, you can achieve a beautiful, natural glow that enhances your natural beauty.

